Thursday, May 31, 2012

Ban Scrolling!

Click graphic to see a larger version. Click the Esc key to return to this post. 

When working with a large Word document, moving around and finding text can sometimes be trying. You scroll and scroll...page after page. You can minimize your pain by using links in the Document Map on the Navigation pane.

To use the Document Map, you must have applied Heading styles. These are the same Heading styles that you would apply to create an electronic table of contents. See Electronic Table of Contents and Styles for more information. Word is again reusing the styles in another mechanism and making your life easier.

Displaying and Using the Document Map
  1. Open a Word document that has several pages with heading styles applied. 
  2. Display the Document Map.
    --Word 2010, click the View tab. In the Show group, click the Navigation check box. The Navigation pane appears with the Document Map showing.
    --Word 2007, click the View tab. In the Show/Hide group, click the Document Map check box.
    --Word 2003, on the View menu, click Document Map
  3. Use the map to move around your document. If you look at the map, you'll see it's an outline of your document...and each entry in the map is a link.
    --Click an entry in the map and Word scrolls to that page in the document. Word adds a highlight to the entry you selected in the map.
    --Click the small arrows to the left of entry text to open and close sections...a big orange arrow is pointing to the arrows in the graphic above.
    --Right-click an entry to display a pop-up menu with more options. 
  4. Look at the two additional buttons at the top of the pane.
    --Click the second button to see thumbnail versions of pages in your document.
    --Click the third button to see the Find pane, which you should be able to use if you've read the Find posts. 

To turn off the Document Map, repeat the actions in step 2...turning the map on and off is a toggle.  Or, you can click the X at the top of the Navigation pane to close it.

Working with Word and using the Document Map will help you avoid...dare I say...ban unnecessary scrolling.

Monday, May 28, 2012

It's Never Good News When...


When your system or document decides to act up or act out, you might find yourself crashing out of Word without being able to save your document. Word is set up to auto save a backup copy of your document at timed intervals. The recovery has been in versions of Word for a very long time and for the most part works the same from version to version.

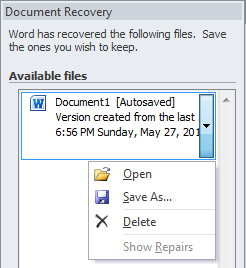
After you restart your system and open Word again, the Document Recovery pane appears automatically. It shows a list of auto saved copies that it has. You can have several in the list. Click an auto saved file in the list and the text from that auto saved document appears in the normal document area. You can click File and Save As to save the text under another name.

You might not be able to recover all of your text, but you should be able to recover quite a bit of it. Saving often when you work on a document affects auto recovery and can aid in you recovering more of your document than you might if you just rely on the auto save.

You'll also see that each auto recovery version includes a drop-down, which also allows you to open, save, or delete an auto saved version of the document.The Show Repairs option on the drop-down is for a repaired document. The same recovery pane can appear when you have a corrupted document.   Look at the bottom of the pane for the Close button to close the pane.

Show Repairs


Documents can be corrupted and repaired for any number of reasons. When a document has been passed via email several time, you can have a problem. Problems can also crop up when a document has been opened on different systems with different versions of Word. You can frequently pick up wonky code when you copy and paste from one source to another--for example, copy text from the Web. You'll know you have a problem document when Word stalls and you look at your status bar and see that Word is repairing your document.

If and when a document that Word is trying to repair crashes, you'll see that you have several auto saved copies. You can use the drop-down to see the repairs...which you may or may not understand and be able to do something about. I usually pick the second document in the list and save it under a new name. My thinking is that whatever went on that caused the problem is still present in the first auto saved document...especially if the second one doesn't try to auto repair when I open it up!

Corrupted documents is one of the reasons that people use versioning on documents. For example, I have a 200 page family tree. It's filled with tables that list nothing but names, dates, and places. It's a quick reference for anyone who wants to know if they are part of the McKee family from the Sparta area of Randolph County, Illinois. The file is save under the name McKee_Tree_052512. The number string at the end is the date that the file was last edited. Word has built-in versioning; however, I've found my hang-a-date-off-the-end works well without my having to inspect the document. At any given time, I might have the most recent two or three version of the tree. If my tree starts acting up, I can use the next previous version to start working again without having to deal with corruption.


If all else fails...
Documents can become so messed up that no matter what Word or you try to do the document is going south with no stops on the way. Desperate times call for desperate measures. When all else fails, try this recovery method.
  1. Close all documents in Word, and then close Word.
  2. Open Word again. A blank document appears. This document is the lowest level of a template available in Word.
  3. Import the document with which you're having a problem.
    --Word 2007/2010, select Insert, Object (the drop-down arrow), and then Text from File.
    --Word 2003, select Insert, and then Insert File.
    A navigation dialog appears.
  4. Navigate to the file that has the problem and select it. Word imports the text in the file and formats it as it goes.

    Word resets all selections you've made so that it corrects any problems the document might have. You can repeat this process more than once to get rid of layers of problems (yes, it's possible to have layers of problems). I've only had to do this multiple time on a few occasions; however, when I needed to know this process, having tucked it away in the back of my brain saved me lots of pain and suffering.
Newer versions of Word are more stable and the instances of corrupt documents has decreased with each new version of Word. However, it's still possible, but you now at least have an option to try when trying to recover a large or important document.

Wednesday, May 23, 2012

It's the Little Things that Make Me Happy...


If you're a long time reader of this blog, you've read lots about the hidden codes in Word.

If you're new to this blog, you're going to want to learn about the hidden codes that help you troubleshoot a document when it goes south on you. See Hidden Codes

When you copy text from one place to another and you've applied a style--for example, a Heading style, you can select the Paragraph mark to copy the style with the text...or not if you don't want to copy the style too.

When I select text to copy, my options are set so that I select the Paragraph mark automatically. When I don't want to include the Paragraph mark in the selected text, I struggle. I could reset my select options but I like them the way they are for most tasks.

I've recently had someone show me an extremely helpful shortcut. When I select text and the Paragraph mark is selected automatically, I can hold down the Shift key and press the left arrow key once to deselect the Paragraph mark. Problem solved!

I read about shortcuts all the time. Understanding them in a practical way that makes the knowledge useful sometimes eludes me. Since I've written so much about using Word, I thought you'd like to know that I still have lots to learn too...perhaps not the big stuff...but lots and lots of little and extremely helpful stuff like the topic of this post.

Sunday, May 20, 2012

Word Ribbon Keyboard Shortcuts


Newer versions of Word have moved from a menu to a ribbon that functions in a different way. For example, have you tapped your Alt key while cruising along and had all sorts of letters turn up on your ribbon? If you kept typing, you probably had a dialog appear that you had to cancel out of because you typed a letter that picked a menu option on the ribbon. This functionality is new in Word 2007/2010 and is geared toward anybody who is crazy for keyboard shortcuts (read touch typist). Here's how it works.  
  • Tap the Alt key on your keyboard to display the letters in square boxes. 
  • Look at the letters associated with each ribbon (F=File; H = Home; etc.)
  • Type the letter of the ribbon you want to display. For example, type H to display the Home ribbon. 
  • Look at the ribbon...it's littered with letters and numbers in square boxes. 
  • Type the letter or number. Depending on the option you picked, you display a dialog or initiate an action.
    --Pick a ribbon option with a drop-down arrow and you get a dialog.
    --Pick a ribbon option without a drop-down arrow and you get an action
    (For example, bold turns on and when you type your text is in bold font). 

If you customized a Quick Access Toolbar, be sure to notice that when you tap Alt Word adds numbers to the buttons you've added to the toolbar too. Type a number to display a dialog or initiate an action.

Want it all to just go away? Click once anywhere in the body of your document or tap the ESC key and it all dissolves.

It's All About Real Estate...
Speaking of dissolving...Want to get rid of the ribbon altogether and get more screen real estate?

  • Look on the right of your screen beside the Help question mark just below the X that closes your document. You're looking for a small inverted V (caret) that is a toggle. 
  • Click the caret and the ribbon disappears...rolls up into menu options and the inverted V turns into a regular V. 
  • Click a menu option to display just one ribbon. Click a button on the ribbon. Word displays a dialog or completes an action...and hides the ribbon again. 
To restore the ribbon, click the V in the upper right of your screen and it's baaaack.


Tuesday, May 15, 2012

More Please...Part 6


Another way to narrow your search criteria is to use the Find In button on the Find tab. You can limit your search as follows:

  • Current Selection: Highlight an area in a document--for example, a chapter. Enter a search term in the Find what field. Click the Find In button, and then select Current Selection. Word searches only the highlighted area of the document. 
  • Main Document:  Enter a search term in the Find what field. Click the Find In button, and then select Main Document. Word searches only the the main document...by passing headers and footers or any other area of the document.
  • Headers and Footers: Enter a search term in the Find what field. Click the Find In button, and then select Headers and Footers. Word searches only the headers and footers of the document. 
  • Footnotes: Enter a search term in the Find what field. Click the Find In button, and then select Footnotes. Word searches only the footnotes of the document. 
If you don't select an option from the Find In drop-down list, Word searches all of the document, including the main document, headers, footers, and footnotes. Using  an option from the Find In drop-down list narrows that search. I use this option mostly to search headers and footers. 

After you find what you are looking for, you can click the Replace tab and enter replacement text. 

Monday, May 14, 2012

More Please...Part 5


And, as always with Word, you can find the Find and Replace dialog tucked into one additional place if you're using Word 2007 or 2010. Look in the lower left of any open document.

  • Click Page X of X. The Find and Replace dialog appears. Notice it's on the Go To tab; however, you can select and use the Find or Replace tabs.
  • Click Words: XX/XXXXX. The Word Count dialog appears...really handy when you're trying to keep track of the word count in an article. 
  • Click the book with the red X (third button from the left). The Spell Check pop-up appears. The red X tells you that your document has misspelled words in it. If you don't see the red X, your document is clean. 
  • Click the last button if you've been messing with macros. We haven't talked about macros. You can use them to have your system complete a series of steps for you. Using macros is an advanced technique. Perhaps later we'll get into a few of them. I rarely use them; however, there are a few you might be interested in. 

Wednesday, May 9, 2012

More Please...Part 4

In the last post, I said we would talk about the Special drop-down list. I use options on this drop-down when I'm troubleshooting.

For example, in a long document, I want to look at every place that I've enter a manual page break (Ctrl + Enter) and consider replacing it with a section break. It's easy to put in the wrong type of break in the heat of the moment.

  1. I don't enter any text in the Find field; however, I do click in the field and select the Manual Page Break option from the Special drop-down list.
  2. I don't enter any text in the Replace field; however, I do click in the field and select the Section Break option from the Special drop-down list. Word is going to assume that it should pick the section break you set up in Page Setup dialog on the Layout tab and in the field Section start.
  3. I then click the Find Next button to go to the first instance. I decide whether to replace the manual page break or no.  I click Replace (or not), and then I click the Find Next button to move to the next instance.
Special Button


Hyphens
Another instance when this drop-down is helpful is searching for hyphens. To hyphenate or not to hyphenate is a hot topic for lots of people. Some people refuse to use them while others just love them. The one place where they are necessary is in a phrase like mother-in-law. It's a phrase that is intended to be treated as one word and the hyphens cause it to be one word. The problem comes in when one of the hyphens happens to be at the end of a line and the rest of the phrase wraps to the next line. If this sounds familar, I've talked about this before in the post Using Non-Breaking Characters.

The Special drop-down on the Replace dialog comes into the discussion when you need to know exactly what you've done with the hyphens in your document. When I look for this sort of info:
  • I leave the Find field empty, but click in the field and pick Optional Hyphen from the Special drop-down.  
  • I leave the Replace field empty, but click in the field and pick Nonbreaking Hyphen from the Special drop-down.
  • I click the Find Next button to go to the first instance. I decide wether to replace the hyphen or no. I click the Replace button (or not), and then I click the Find Next button to continue.
As you can see from this post, the Special drop-down options have limited use. However, when you're finalizing an important document--like a book--knowing where to find these types of options can make you work more efficiently.

No Formatting Button
Word remembers many of the formatting commands that you add from the More area of the dialog. When you start a subsequent search, you can get frustratate if you happen not to remember to remove the formatting commands. It's worth click the Not Formatting button to clear the decks before you start a new find or replace operation.

Tuesday, May 8, 2012

Cool Stuff Acomin' from Microsoft...Windows 8 Preview

Windows has started revealing what they are including in Windows 8, which is slated to come out later this year. If you're a person who regularly updates to the latest software (or you're an unfortunate soul who gets unceremoniously up'ed to a new version because of a computer event), you might want to check out Lynda's introductory video: Windows 8 Consumer Preview First Look. You can't beat the price. It's free (at the moment). Some cool stuff is acomin'!

Monday, May 7, 2012

More Please...Part 3

Click the graphic to display a larger version, and then press the Esc key to close it. 

In a previous post I promised to look at options on the Format drop-down.

Format Button on Find and Replace Dialog
Click in the Find or Replace field--depending on which text you want to affect--and then click the Format button to display a drop-down list of formatting options.

Select an option--for example, Font--to apply formatting options.

Depending on the field in which you've clicked to place your cursor, you might be affecting the Find or the Replace version of the text and the name of the corresponding dialog that appears. For example, in the sample above, the Font dialog is titled Replace Font because I click in the Replace field and the selections I'm making affect replacement text.

In the example above, I'm looking for every instance of plain text Tremé and I'm going to replace it with Tremé, which has bold and small caps without all caps applied. In a long document, 100 pages, Word will find every instance of Tremé and replace it with Tremé

Depending on what you've applied in your document, some or all of the options on the drop-down list will be of interest because you can sweep through a document and make massive changes in one sweep. 

Following is a list of the available options. If you're a longtime reader of this blog, the options corresponds to a dialog that you've already used. I'll add the links to the past posts. Remember that Word never presents a new dialog if it has an existing dialog...it just reuses the existing dialog...usually with a slight twist. However, if you've already used the dialog, you have a running chance of understanding what is happening when you see the dialog. 

Format Button Options

  • Font = Select this option and you get the Find/Replace Font dialog, which has the same options on it as the Font dialog. You worked with this dialog in the post Format-->Font. I rarely use this option because I usually make changes using a style. However, if you under the gun, knowing how to find text with a narrowed search and/or making massive replaces on the fly might be helpful. 
  • Paragraph = Select this option and you get the Find/Replace Paragraph dialog, which has the same options on it as the Paragraph dialog. You worked with this dialog in many posts, for example, the post Format-->Paragraph. Again, I usually affect paragraphs using styles; however, you should know that you can find/replace using Paragraph-related options.  
  • Tabs = Select this option and you get the Find/Replace Tabs dialog, which has the same options on it as the Tabs dialog. You worked with this dialog in the post To Tab or Not to Tab. I rarely use this option. 
  • Language =  Select this option and you get the Find/Replace Tabs dialog, which has the same options on it as the Language dialog. You worked with this dialog in the post Suppressing the Spell Checker with a Style. I rarely use this option. 
  • Frames = I don't use frames...if you've hacked your way thru it, God love you...you're a patient soul. I never use this option. 
  • Style = Select this option and you get the Find/Replace Styles dialog, which has the same options on it as your Styles list. Select a style that has been applied to the text. For example, if you are looking for the word settler and you want to find it in a Heading 1 title, select the style from the list and Word will only look for settler with Heading 1 applied to it. In a very long document, being able to target your find or replace can save you lots of time and trouble. Because I always apply styles to text (Always!), I use this option when finding and replacing.


  • Highlight = Did you apply highlighting to your document? Highlighting areas of your document can help you when editing. If you want to find all highlighted text, don't enter anything in the Find field, select Highlight from the Format list, click the Find Next button and off you go to ever spot you applied the highlight. This option is most convenient when you're doing a final clean-up and you want to make sure you've removed all highlighting. I frequently use this option because I frequently use highlighting (different colors) to mark different areas of text that might need different types of attention. 

Next Post
In the next post we'll look at the options on the Special drop-down list.

I realize the Find/Replace posts are tedious. However, understanding how to narrow your find criteria and use your replace criteria to make changes on the fly can help you greatly when you're in a rush...or if you just want to learn to work more efficiently.

Thursday, May 3, 2012

Much Ado About Graphic Software...Part 10

Sorry I haven't been posting this week. Work has been challenging...a combo of the words hell and handbasket come to mind. So, in exasperation, I'm going to do a post in the graphic series, and then try to catch up on my sleep. Perhaps I'll be able to do better next week.

Moving Pieces of Graphics 
In the last post, one of the steps you completed to construct the graphic from pieces involved you grabbing a pasted piece and moving it to a position so that it wasn't covering another pasted piece that you wanted to show. You can take that idea one step further and alter displays to present data in a different way.

Think about a census. My people are usually listed starting on about line 17 or worse. I'm usually fussing with a copy of census headings and trying to match them to interpret the data.

Using Paint, I can move the census lines I want to see and align them directly under column headings.

Turn this...
Into this... 
Click the graphic to see a larger version, and then click the Esc key to close the graphics. 

Altering the Display
  1. Use the PRT SC button to capture a copy of a census page on your clipboard. Remember to press the extra button if you're on a laptop.
  2. Open Paint (Start, All Programs, Accessories, Paint). 
  3. Paste (Ctr + V) the copy of the census into the Paint palette.
  4. Use the Select tool to select the lines in the census that you want to move. Paint adds a dotted line around the area you selected.
  5. Click inside the dotted line and do not release your mouse button. You just grabbed the selected area and you're holding on to it. 
  6. Move your mouse around and you'll find that the selected area moves too.
  7. Align the select lines with the column headings.
  8. When you're happy with the display, release your mouse button. The dotted lines remain so if you need to make adjustments, just click in the dotted area and do not release your mouse button. Make the adjustment, and then release your mouse button.
  9. Click anywhere outside of the dotted area to make the change permanent. 

This same method works if you open a scanned census page (or whatever) that you've saved as a .jpg.

Are you going to want to alter every census page like this? Certainly not. However, when you need to make a point with a picture, knowing how to alter the picture to illustrate your point certainly can't hurt.