Wednesday, February 29, 2012

Table It!...Part 9...Borders and Shading Button

When you click the Borders and Shading... button on the Table tab, the dialog appears with three tabs...You're three layers down in Word and perhaps it's more than you bargained for! However, if you treat the layer like any other complicated thing, you simply dissect and digest it bit by bit.

Borders Tab

Use the Borders tab to control the lines appearing around cells in your table. I use this dialog frequently.
Page Border Tab

Use the Page Border tab to control the lines appearing on the edge of pages. I've never had a reason to use this particular dialog. However, you can see that it should function in much the same way as the Borders tab with the difference being that the borders will apply to the larger area of the page...think of the page as one big cell.
Shading Tab

Use the Shading tab to add color (and/or a pattern) to one or more cells in a table. Or, if you've used the Page Border tab, use this tab to add color (and/or a pattern) to the page.

The Fill drop-down on the Shading tab should look familiar to you. You've seen and used the color palette before in the post Frame Up Part Three...Adding Color. You might want to read that post if you're not up on using the color palette. The exact same palette appears when you select the Color drop-down on the Borders or Page Border tabs. After you learn to use the palette in one context, you can apply that knowledge throughout Word because Word consistently uses the same palette each time that color is an option.

Apply to Field
The one field on these dialogs that will get you into trouble quickly is the Apply to field. If you don't make a selection in this field, it's a real crap shoot as to what you'll wind up with. At least once a day, I miss making a selection in this field. When you do it and mess up your table, the fix is easy.

Hold down the Ctrl key and type the letter Z (Ctrl + Z) to undo the mistake. Make your selections again...and remember to pick Table, Cell, or Paragraph in the Apply to field.

By now you know, I'm a shortcut key kinda gal. However, you might like buttons better. So, you can also click the Undo button, which is visible in Word 2003. In Word 2007/2010, you need to add a Quick Access Toolbar, and then add the Undo button. See the post Displaying Buttons You Need for more information.

Next Post
So, now that I've told you where you're likely to get into trouble and how to get out of it, I can start talking about what you can do on the Borders tab in the next post.

Monday, February 27, 2012

Table It!...Part 8...The Properties


With your mouse, right-click in any cell of a table and the popup menu appears. The popup menu is context sensitive, which means that you will see table-related menu options only when your cursor is located in the cell of a table.

If you select the option Table Properties, the following dialog (or one similar to it) appears.

You've seen this before in Part 4.

Properties are a group of tabs that allows you to control tables more precisely. Depending on how you work and what your preferences are, you might be perfectly happy with using the ruler (remember the ruler) and menu selections; however, a few changes are easier on Properties tabs. Of note, when you make changes using Properties tabs, the changes apply to the entire table (unless you make other choices).

Table Tab
This tab allows you to dictate the width of the table you insert in your document. For example, if you want a small table that takes up only one half of an 8 1/2 x 11 inch page, you would want a table that is never more than 4.25" wide. Here's a sample of what the table might look like.
Hidden codes are visible so that you can see all of the markings. Here are the choices I made on the Table tab to get the result above.


Create your own table and reproduce the table and text that I have above, and then start clicking the different options in Alignment and Text wrapping to see how it affects your table.

The Table Positioning dialog, which you can see after pressing the Positioning button, allows you to make additional adjustments; that is, you can fine tune the table.

A few other buttons are on this tab too: Borders and Shading and Options. I'll talk about these additional buttons in the next post. 

Saturday, February 25, 2012

My Tablet...A Geek at Work...Astrology

One of the geeks at work spotted my Asus tablet, grabbed it, and loaded my work email and calendar on it.

When I explained that I had loaded something I didn't want, he showed me how to get rid of it. You hold your finger down on it, and when Remove appears at the top of the screen, you swipe your finger toward it to toss away the app.

I was complaining that I had no idea where apps will wind up when I load them. He installed Apps Organizer and showed me how to add labels and organize the apps. So--after a weekend of moving apps around--I should have all of my genealogy apps labeled Genealogy so that I can find them all in one click. Wish me luck...I may need it.

My geek also showed me how to move apps around...including moving the camera from the master App list to the home view (correct term?) where I can get to it quickly. Touch an app to select it and then start dragging your finger to where you want to drop the app.

I'm still carrying the tablet around with me everyday and everywhere. I'm trying to integrate it into my everyday life. I keep trying to  embrace it but I'm still happiest on my laptop. I keep saying that if you learn to use a laptop well you won't want a tablet because a laptop is so much easier to use. Yet, lots of people I know are clinging to their tablets. I'm trying to adjust my attitude, thinking perhaps I'm just not getting it. But the harder I try to make myself use it, the more stuff I find that is easier to complete on a laptop.

Here's a quirk for you. The tablets have no Delete button (at least no tablets I've seen). When you want to delete something, you tap the screen at the end of where you want to start deleting and a tag (cursor) turns up to mark your location. You use your finger to move the tag to the end of where you want to start deleting and start pressing the Backspace button. So you can delete but it's a bit clumsier.

My work geek suggested that I download an app named Lookout. If I lose my table or it goes missing, the app will let me track it down (GPS and the camera I think). Of course, getting it back might be a different story.

The one good thing I can point to is the battery life. Again, the tablet has been running for the better part of four days in and out of the docking station. I've been on and off of it during the four days and the battery is at 23%. I cannot complain about battery performance! Both the tablet and the keyboard docking station each have a battery. When I charge the tablet, it charges both, and as long as the tablet is docked, it runs primarily off of the docking station battery. Of course when I undock the tablet, it runs on the tablet battery.

And then there's my horoscope. I'm an Aries and in the Tampa paper this a.m. it says, "Resistance to change might be futile. New technologies and gadgets may complicate your life, but you must be willing to bend with the winds of the latest trends. Loved one might be surprisingly rebellious." I think I might better cope with a surprisingly rebellious loved one than I'm coping with the new technology. But who can resist the winds of the latest trends?

So that's the progress report on the tablet. I'm still not giving up...there is my horoscope to consider...it must be something I'm just not seeing...

Friday, February 24, 2012

Much Ado About Graphic Software...Part 1

One of the presentations at RootsTech was for a piece of screen capture software called Snagit. I didn't attend the session in part because I've used Snagit in the past. It's an excellent tool for creating graphics, for doing large scrolling screen captures, for sharing to social media, and for completing an assortment of other tasks. If you google screen capture software, you'll find that there's lots of this type of software available. Some of it is free. Some of it is commercial software with varied costs. Snagit is going for $50.00 these days.

If you're a professional genealogist, you may want to consider purchasing software. If you're a hobby genealogist on a tight budget, you might be surprised to find that you already own a lesser but similar tool that might meet your needs.

Paint

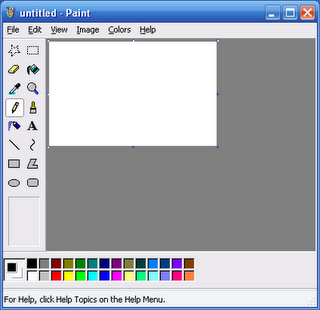
For as long as I can remember, Windows has included a low level graphics program called Paint. Most people don't know that the program is there, and if they do know, they've never learned to use it. In my opinion that is ashamed because many screen capture software programs are modeled off of Paint.

What does that piece of info mean to you? It means that if you learn to use Paint before you purchase commercial software, you'll have a better chance of assessing the software you are considering for purchase. Learning to use Paint will also cause you to assess your needs and decide whether you need to purchase additional software at all.

You may also be interested in knowing that I use Paint to produce every screen sample you see in this blog. I use it to clean up graphics, to add the circles around and arrows to items I want you to look at, to add comments directly in the graphics, and to layer one graphic over another so that you can see the results of a selection process. In my own genealogy, I use it for several addition tasks; for example, clipping sections of newspaper columns and placing the clips so that I create one graphic.

If you are using an earlier version of Windows, you'll find that Paint is somewhat limited. You can still accomplish ordinary tasks; it's just that you'll have to click more to accomplish those tasks. If you are using Windows 2007 or greater, you'll find that Paint is very useful for doing everyday graphical tasks.


In addition, if you use a Mac, there's a free clone that you can download.

If you're a long time reader of this blog, you may remember that I've had you use Paint to crop and turn graphics. We just did that with tables. I haven't given you much background where Paint is concerned. So I thought I'd do that in this post.

Opening Paint

Select Start, All Programs, Accessories, and then Paint. The palette appears.


The Home tab contains the majority of the tools you'll use. I'll go through the tools and give you a run down of what I use (if I use it) and how I use it. If you're using an earlier version of Windows, here's what your palette looks like.


If you look closely, many of the buttons use the same icon for the same function. For example, regardless of the version the Eraser, Pencil, and Eye Dropper present with the same icon. Other items that are on the toolbar in current version of Paint are in menus in earlier versions of Paint.

Resizing the Drawing Area

The drawing area is the bright white space you see in the sample screens above. When you capture a screen and paste it into Paint, the palette resizes automatically. However, as your use becomes more sophisticated, you'll need to know how to resize the drawing palette. The process is the same regardless of the version. The palette has small circles along the outer edge. Point at any circle and your cursor changes to a double-headed arrow. Click your mouse once to grab the circle and drag your cursor to resize the palette. When the palette is the size you want it to be, release your mouse button.

Capturing a Screen
  1. Display any web page you like (actually anything on your screen).
  2. Press the PrintScr button. If you're on a laptop, you'll probably need to press a color coded function key too. On my laptop, I hold down the FN key, and then press PrtScr. Windows places a copy of your screen on a clipboard (temporary storage area).
  3. Open Paint if you don't already have it open.
  4. Paste the screen capture (Ctrl + V). You get the whole thing. You don't want the whole thing.
Clipping and Saving What You Want

  1. Use the Select tool to select the portion of the capture you want. You've already done this task.
  2. Click the select tool.
  3. With your mouse, click in the upper left of the area you want to keep.
  4. Move your cursor to the lower right of the area you want to keep.
  5. Let go of your mouse button. Paint has added a dotted line around the selected area. The outlined area is what your graphic will look like.
  6. Crop the area.--In Windows 2007/2010, click the Crop button beside the Select tool. Paint displays the cropped area.
    --In earlier versions, copy the selected area (Ctrl + C). Open another instance of Paint (you can run more than one session of the same software). Paste the selected area (Ctrl + V).
  7. Save the cropped area. Select File, and then Save As to display the Save As dialog.
  8. In File name, add a name.
  9. In Save as type, select PNG (*.png). Your version of Paint may default to .png. Just be sure to confirm you have the right file format selected so that you don't loose color in the graphic.
  10. Click the Save button.
Evaluation

Can you do this same task easier with Snagit? Yes, you can. Is that ease of use worth $50.00 of your cash? In my opinion, no, it's not.

Can you do more with Paint? You can do lots more with Paint just as you can do lots more with Snagit. What you learn to do with software is often a reflection of your needs. In my opinion, these needs should be assessed before a cash outlay.

Future Postings

I've just started talking about Paint and I have to be careful because I have an outstanding article on the topic that I hope to have published. I don't want to rob myself of my own thunder! However, Paint offers lots of capabilities that I didn't talk about in the article. So, we have lots of territory to cover while I wait out seeing if the article makes it into print.


Wednesday, February 22, 2012

Table It!...Part 7...Turn Word Table into Graphics

Brace yourself. It's another zinger!

If you remember, I'm trying to place a landscape size table into a portrait oriented document. I've also made the assumption that since the original project was a report to a client that the document is several pages in length. To get the table to appear mid-document, I need to convert it to two graphics and turn the graphics. I've talked about a similar task once before. See Turn the Graphic or Turn the Page and Flip that Graphic for more information on what your options are and why you would want to rotate the graphic instead of the page. At any rate, we want a document that ends up looking like this...


Notice that this sample has mirrored margins and the second page has running text beside the graphic.

To capture part one of the table:
  1. Open the landscape Word document with the table. 
  2. Set your view to about 70%. You need to adjust your display so that you can capture all of the table on page one in one window. Depending on your screen size, you might need to fuss with your system a bit to get the same results. After page one of the table has been turned into a graphic, you can resize it as you would any other graphic.
    --Word 2003: On the View menu, click Zoom. Under Zoom to, enter 70%. Or, if you happen to have the Standard toolbar displaying, you can enter 70% in the Zoom box, which most likely has 100% in it.
    --Word 2007/2010: You can use the slider in the lower right of the page. Or, you can select View, and then click the Zoom button to display the Zoom dialog. In Percent, enter 70%, and then click OK
  3. Click the PrintScreen button. Word adds a copy of your screen on the Word clipboard (temporary memory area). If you're working on a laptop, you need to press a combination of color coded keys. On my laptop, I press FN +PRTSC
To create the graphic:
  1. Open the graphics program Paint. Select Start, All Programs, Accessories, and then Paint. The program opens. 
  2. Paste the screen capture. Hold down the Ctrl key and type V (Ctrl + V). 
  3. Click the Select tool.
  4. With your mouse, click in the upper left of the table on page one and move your cursor to the lower right of the table section on page one. 
  5. Let go of the mouse. Paint has added a dotted line around the selected area. The outlined area is what your graphic will look like.
  6. Crop the selected area.
    --In Windows 2007/2010, click the Crop button beside the Select tool. Paint displays the cropped area.
    --In earlier versions of Windows, copy the selected area (Ctrl + C). Open another instance of Paint.  Select StartAll ProgramsAccessories, and then Paint.  Paste (Ctrl + V) the selected area. 
  7. Save the cropped table. Select File, and then Save As to display the Save As dialog. 
  8. In File name, add a name; for example, 1850 Table 1.
  9. In Save as type, select PNG (*.png). Your version of Paint might default to .png. Just be sure to confirm you have the right file format selected so that you don't loose color in the graphic. 
  10. Click the Save button. Do not leave Paint or close the graphic. 
To rotate the graphic:
  • In Paint 2003 or 2007, select Image, Flip/Rotate, Rotate by angle, 90 degrees, and then click OK.
  • In Paint 2010, select Rotate on the Home tab, and then select Rotate Left 90 degrees
Save the graphic. If you're asked if you want to replace the current version, select yes.

To create part two of the table:
Repeat the instructions above to convert the section of the table that is on page 2 of your landscaped Word document. After you have the two graphics, you're ready to insert the graphics into a document.

You might have to use your imagination on this part. Or, if you happen to have a document that is several pages long, open it, save it under another name (for example, Junk), and complete these instructions to see how the graphics are inserted.

Insert graphics into document:

  1. Open the document in to which you want to insert the graphics. 
  2. Type the text: 1850 Census Entries for McKee in Randolph County, Illinois.
  3. Apply a Heading 3 style.
    (See Electronic Table of Contents and Styles if you need help applying a heading style.)
  4. Make a local change so that the title is on a new page. Right-click to display the popup menu, select Paragraph, click the Line and Page Breaks tab, select Page break before in the Pagination group, and then click OK
  5. Press the Enter key to create a new empty line. 
  6. Insert the part one graphic.
    --In Word 2007/2010: Select Insert, and then select Picture. The Insert Picture dialog appears. Locate the page one graphic (1850 Table 1), click it once to select it, and then click the Insert button.
    --In Word 2003:  Select Insert, and then select Picture. Select From File to display the Insert Picture dialog.  Locate the page one graphic (1850 Table 1), click it once to select it, and then click the Insert button.
  7. Repeat steps 5 and 6 to add the page 2 graphic (1850 Table 2 if you followed the naming convention).
To adjust text wrap:
This step is optional and will depend on how much room you have on the page where you placed the last graphic. If you look at the particular example that I've created, the graphic covers about 1/3 of the page, which means that about 2/3 of the page is empty. You can leave the space empty...white space isn't necessarily a bad thing...or you can change the text wrap option around the graphic, which will allow you to type text in the 2/3 of the page that is empty.
  1. Right-click the graphic to display a popup menu.
  2. Select the Square text wrap option.
    --Word 2007/2010: Select Wrap Text, and click Square, and then click OK.
    --Word 2003: Select Format Picture, click the Layout tab, and then click the Advanced button.  Click  Square, and then click OK.  
  3. Click your mouse to the right of the graphic. Your cursor will begin to flash in the first line beside the graphic. 
Comments
Your page should be finished and should look similar to these pages.
Can you spot the one change that you could make to the second page graphic? Look at the alignment of the two graphics. The graphic on the second page is slightly higher than the one on the first page. The graphic on the first page has a title that is pushing it down on the page. You have two options to fix the alignment.

  1. Click the graphic to select it and press the Enter key to add an empty line before graphic. One empty line is frequently enough to create a better alignment...not perfect but better. You can make a local change using the Paragraph dialog to get the alignment closer (add space before/after to adjust the graphic alignment). For help, see Spacing: Before/After in the post Format-->Paragraph. You may also want to add a page break, which also affects spacing. While you have the Paragraph dialog open, click the Line and Page Breaks tab, click Page Break Before in the Pagination group, and then click OK. If you think you're going to complete these steps more than once, create a style (I call mine Spacer).
  2. Click the graphic and do not release your mouse button. Use your mouse to move the graphic down so that it's more closely aligned. 
So are you gasping yet? I am...actually I'm talking to the trainers at work to see if I can use some software to produce what are basically movies. If we're going to get this complicated, I perhaps need to get a bit more sophisticated.

Upcoming posts are going to involve creating the sidebar title and exploring the many other options that are included in table-related dialogs. We'll also create additional tables. I'll pick up posting on tables again at the beginning of next week. 

Monday, February 20, 2012

Table It!...Part 6...Creating the Table

Brace yourself. This one is going to be a long slog. However, at the end, you'll have several new skills.

To construct this table, you need to open a new document and add the table. After the table is finished, we're going to turn the two pieces into graphics, and then rotate the graphics so that they fit on a portrait page. Here's what the final pages with the table graphics inserted will look like. Notice that you can use wrap options to type text on the right-hand page.

To set up the page:
  1. Open a new Word document.
  2. Reset all margins to .5 inches.
    Open the Page Setup dialog.
    --Word 2003: Select File, and then Page Setup.
    --Word 2007/2010: Select the Page Layout tab and locate the Page Setup group. Click the small arrow in the lower right of the group.
    The Page Setup dialog appears.
  3. Enter .5 for top, bottom, right, and left.
  4. Click the Landscape button.
  5. Click OK.
To add the table:
  1. Add the table title.
    --Type this text: 1850 Census Entries for McKee in Randolph County, Illinois--Apply a Heading 3 style, and then press the Enter key.
  2. Display the Insert Table dialog.
    --Word 2003: From the menu, select Table, Insert, Table.
    --Word 2007/2010: On the Insert tab, click Tables.  
  3. In Number of columns, enter 13.
  4. In Number of rows, enter 10.
  5. Under AutoFit behavior, click AutoFit to contents.
  6. Click OK. The table appears in your document.
  7. Save the document under a name you will recognize.
To add text to your table:
  1. In the first row, type the 1850 census column titles.

    --Click in the first cell, and type the column title.
    --Press the Tab key to move forward to the next cell, and add text.
    --Press Shift + Tab to move backward to the previous cell.
    Notice that in the table I created I abbreviated Age, Sex, and Color. I've included all of the columns because while the census entries I'm looking at do not have entries in all columns that may not be the case for entries you are looking at.
  2. In the second row, type the location description, and then merge the cells in row two.

    To merge, select the entire row. Move your cursor to the left of row two. Your cursor changes from an I beam to an arrow. Point the arrow at row two and click once to select the entire row. Word highlights the row. Right-click in the row to display the popup menu, and then select Merge. Word removes all vertical table borders except the end borders.
  3. Add a gray fill to rows one and two.

    To fill, select rows one and two. Move your cursor to the left of row one. Your cursor changes from an I beam to an arrow. Point the arrow at row one and click once. Hold down the mouse button and drag your cursor down to the second row. Word highlights rows one and two. Right-click in the highlighted rows to display the popup menu, and then select Borders and Shading. The  Borders and Shading dialog appears. Select the Shading tab. In the Fill drop-down, select one of the shades of gray. You add a bit of color to a heading (gray if you are printing to paper) so that your reader has a visual break that they can use to identify titles and locations.
  4. In the third row, start adding census data. You can add the data I show in the sample or your own data.
  5. When you have a new location (township), add the location, merge the fields, and fill with gray to provide a visual break for your reader.
  6. Continue adding entries. When you table breaks to page two, just let it break. After you have two pages of entries, we have two problems to fix: 1) row splitting across page break; 2) no titles above page 2 columns.
  7. To stop a row from splitting across a page break, complete these steps.

    --Select the entire table. Click once anywhere in the table, and then right-click to display a popup menu. Click Select, and then Table. Word highlights the entire table.
    --Display Table Properties. Right-click anywhere in the highlighted table to display the popup menu, and then select Table Properties. Click the Row tab.  In Options, remove the check mark from Allow row to break across pages. Depending on what you've done, you might see the check box filled in with color. Click it twice to remove all marks. Click OK to save the change. The table will allow only entire rows and will not split a row across a page break. Click anywhere outside of the table to remove the highlight.
  8. To add a title row to page two, repeat header rows.

    --On page one, select row one (the title row) of the table.
    --Word 2003: From the menu, select Table, Repeat Header Row.
    --Word 2007/2010: On the Layout tab, click the Repeat Header Row button  in the Data group.

    Regardless of how many pages of census entries you enter, the heading row will appear at the top of each page.
So are you exhausted yet? I know I am. So I'll save turning the table into a graphic for the next post. After you have the table you want, turning the pages into graphics, rotating them, and inserting the graphics into a document is a minor task. So until the next post, happy table making.

Sunday, February 19, 2012

Pinterest Update Update

I'm doing this post far too late...I should be in bed!

Proper pinning with Pinterest = http://thedailydigi.com/how-to-properly-pin-to-pinterest-a-tutorial/.
Also includes comments that are interesting. Seems to have an association with scrapbooking.

The ultimate guide...maybe I'll have better luck at figuring out how I want to use Pinterest...
http://theblogstylist.com/pinterest-add-pin-it-button-blog/

Pinterest Update

Hmmm...It appears you must be able to pin a graphic published on a website. So far I'm struggling with seeing how this might help with my genealogy...unless I start traveling and taking lots of photos that I can upload and label for family members... 

However, my gardening could get a real boost since lots of gardening involves being able to see rather than read.

And each time you pin a graphic, it turns up in the public stream of graphics...so careful what you pin!

Pinterest...and no Pin coding

I haven't done much with Pinterest yet. My friend Cathy invited me to join. I fussed with it a bit. Then my sister-in-law Fawn started following me (pressure!). Then Drew Smith started following me (real pressure!). I haven't seen a lot written about Pinterest yet but I must admit it looks fun and interesting.

Then today, I happen upon a Twitter post with news from Pinterest. Apparently, some web providers don't want to be pinned to a Pinterest user's page. The deal with Pinterest is that you set up your own page and you pin webpages you like. Anyone who is following you can visit your page and see what you've pinned. That is unless the webpage has banned pinning. Here's the link that the Twitter poster provided to the article with details: http://llsocial.com/2012/02/pinterest-offering-code-to-block-pinning/.

Playing with Camera in Tablet

My Garden
Ha! You find pictures you've taken with the tablet under From Your Phone!

At last, I have a view finder I can handle. I'm not fussing with a tiny digital camera. 

Problem is when you are outside the screen doesn't let you get a good look at what you are shooting. Still the picture is a nice one. The day here in Florida has been sunny and then over cast, threatening to rain. The more over cast the day is the easier it is to see picture composition. Going to graveyards may be an activity best done on over cast days both for the camera and heat here in Florida.

The next version of the Android operating system (Ice Cream), which I have yet to locate, is suppose to fix problems with the camera. I'm not sure what those problems might be. The camera is pretty easy to use. Uploading pictures using Blogger...well not so easy. I'm getting quirky things happening to me while doing this blog post...things that do not happen on my laptop. Still it might be my learning curve. The Galaxy Girls at RootsTech did note that they don't do their blog posts on tablets. 

P.S. In  the category of snide remarks, the man in my life observed, "For someone who kicked and screamed about buying that thing (the tablet), you sure are on it a lot." Since he paid for it, I just don't want to tell him I'm trying to justify the purchase because again I see no burning need to have one of these things. 

Same thing for the hotspot he bought...nice to own but is it really necessary? I guess only time will tell.

P.P.S. I'm on my laptop now...big discovery...you cannot edit a published blog post on the tablet...you get no Update button.

On the plus side, if you press Ctrl + S on the tablet, you get a list of sites where you can share your blog post (the usual suspects...Facebook, Twitter, Google +, etc.). So now I'm wondering what other keyboard shortcuts did they build into the tablet docking station?

Saturday, February 18, 2012

Table It!...Part 5...Creating a Table with Census Returns

I originally started talking about tables because Michelle (a reader) likes to take census returns and present them to her clients in a table. Therefore, that's the example I'm going to use for creating a table. The table will include every census entry with the surname McKee in Randolph County, Illinois in 1850.

The first thing I have to do is create a plan for the table.

  1. Am I going to have entries only for the 1850 census or am I doing other census years?
    If only 1850, you can be more artistic and place the title in the table.
    If more, you will likely want to have a title that can be picked up in a Table of Contents (TOC).
  2. Do I want the table title to appear in a TOC?
    If yes, place the title of the table above the table and apply a Heading Style (probably a Heading 3).
    If no, you can be more artistic and place the title in the table. 
  3. Do I want to include every column that appears in the census?
    If yes, change the page orientation to landscape (wider than tall).
    If no, you might be able to fit the table on a portrait page.
    In addition, you can treat the table as a graphic and turn it so that it fits sides ways on a portrait page. We'll talk about this process in a later post. 
  4. Do you have enough skills to construct the table in the middle of your document?
    If yes, go for it.
    If no, open a new document. When you have the table you want, you can copy and paste it into your document.
Here's the table I constructed in a separate landscaped page with a Heading 3 title. 


Here's the table I constructed in a separate landscaped page with a sidebar title (won't be in TOC).


The tables have a couple of problems. 
  1. The first table breaks in the middle of a row in the table. That doesn't happen in the second table.
  2. The headings don't show on the second page. 
These problems are easily fixed using menu options and table properties. However, first you need to reproduce the table. I'll take you through those steps in the next post, because there are a few new instructions (for example, changing page orientation so that you can construct the table). 

So see you in the next table post...

New to this Blog?...Let me Explain What I've Been Up To...

After Pattie said something to me about the readings she was getting on the blog, I started watching the statistics. There's a lot more reading of this blog than there has been in the past.

Since I'm posting about several topics and interspersing MS Word table instructions, I thought you might need a bit of background on my blog postings. I'm a technical writer by profession, and as a result, a heavy user of MS Word. I keep seeing Word sessions in many of the conference schedules. They can be as short as one hour or sometimes longer. Learning everything you need to know about using Word in such a short period of time isn't easy.

A little more than a year ago, I started posting bits and pieces about using MS Word with particular emphasis on how a genealogist would use Word to do many tasks, including writing a book. Through the year I've covered creating a template from scratch, using styles, and lots of other tasks. My thinking was that if my readers learned a little bit a few times a week that at the end of the year they would be getting along with Word much better than they had in the past. Based on my email, a few meetings with blog readers, and the steady increase I've had in readership, I seem to be meeting my goal of making Word easier for people to use.

One additional note...I've endeavored to explain why things work in Word, how many functions in Word are connected to other functions, and why you might care to learn to use this function or that one. One of my problems with my own profession is that you get good instructions to do a task, but if you don't know why you would care to do the task, why would you bother to learn it? I try to give you real world applications for how a genealogist would use functions in MS Word.

So, if one of your ambitions is to produce a book using MS Word, please read the sections labeled Template. If you read the posts in order and complete the instructions, you'll find that you wind up with a 26 page template that is ready for execution...that is, you adding your personal text to produce a book.

Also notice that as posting became more complicated, I started numbering the parts so that they could be read in order. You see that happening right now with the use of tables.

So, if you're new to this blog and staying a while to read, welcome, and thank you for your time and attention. I hope you find it useful. If you have questions, post a comment or write to me at info@technology-tamers.com. I'll send you a link to a posting or do my best to answer your question.

Friday, February 17, 2012

Virus Protection on my oh so expensive Tablet

As I have said in previous posts, I got my ASUS tablet on the run just a few days before going to RootsTech. I should have asked more questions before I ran out of the store, clutching my purchase. As it is, I found out at RootsTech (Galaxy Girls) that surfing the web on a tablet is no different than surfing the web on a PC or laptop. Ya' gotta have virus protection.

So after throwing caution to the wind for a few weeks, I started looking at virus software. Because my ASUS is an Android device, I could find all sorts of free virus apps in the Android App Store. You don't get much of a description when you start looking at the apps. However, you get an eye full when you start reading the reviews, which are extreme. The app is either the best stuff you ever thought about downloading, or after downloading, the app turns the tablet into a paper weight...rendered unusable. Then you get the inevitable tales of what the person had to go thru to recover from the download. All in all, the talk will scare the bejesus out you. It certainly scared the bejesus out of me.

As a result, I decided to haul myself (and the ASUS) into Best Buy to see what they had to say. Well, $21.39 later, I'm the proud owner of Kaspersky Tablet Security. I can't say at this point if this was the best move or not. However, I figure that for this minimal sum, I'm in better safe than sorry territory. We'll see how having the app on the tablet affects it's performance. Virus software is notorious for slowing systems down. Perhaps the tablet won't even notice it's there.

Thursday, February 16, 2012

Mac Messenger...Hard Page Break

I had a reader of this blog (Nova) ask me a Mac-related question. I don't use a Mac. I'm a PC gal all the way. I've had my fingers on the keys of a Mac once for about 10 minutes.

Nova's question: How do you add a hard page break using a keyboard shortcut?

Seems Nova has the newest version of Word for Mac and Mac added the shortcut...but didn't provide details. I googled and according to what I was reading, it's the same as on a PC...Ctrl + Enter. Nova tried it and it didn't work.

So I emailed Pattie who emailed her sister Mary (a Mac user and avid Apple fan). Mary's advice was to press the Ctrl key and the Enter key on the number keypad.


Nova reports that this method works! 

So, if you're a Mac user who needs this solution, you have Nova to thank for asking the question and Mary for suggesting a solution. Me? I'm just the messenger.

P.S. Nova--Did I get the details right? If no, please post a comment with corrections!

Gedcom Viewer on my oh so expensive Tablet

When I was at RootsTech in Salt Lake City, it was suggested by a presenter that a tablet or smart phone owner could use PDFs generated from genealogy software to successfully do research. I was dubious but I spent a morning in the hotel creating the PDFs, loaded them on to my tablet, and took off for the library.

Talk about a frustrating experience! Trying to use the PDFs was like dragging an anchor around behind me while trying to figure out where I needed to dive into library resources. I don't walk around remembering all of the family details for nearly 2,000 people in one database alone. You have to open and close lots of PDFs to find the info you need to be able to decide if a given library resource is what you need. With the PDFs, unless you have a great memory, they are completely useless.

I went poking around on the web today, and low and behold, there are gedcom viewer apps. I downloaded ezGED Viewer by Source Quest, Inc. The next step was to load a gedcom on to my tablet. I'm lucky enough to have picked a tablet that has USB ports (ASUS), which means I can just attach a wire and download the file from my laptop to the tablet...sorta like using a wire or adapter to download photos from a digital camera or a similar device.

When I opened the viewer, I had to pick a gedcom to display, and then select an icon: Individuals, Families, Reports, Sources, Database Info, or Change GED. The icon labels suggest the type of display you can expect to see and they are accurately labeled. The ezGED Viewer is a free download and very easy to use. If you check it out, you'll see that it's getting well deserved high marks from other users.

I've got to say that had I known enough to download this app while at RootsTech, I would have had a much easier (and more productive) session at the library, because you really can get at your information. In my defense, I had had the tablet less than a week when I went to RootsTech and I was still trying to integrate it into my life...Actually, I'm carrying it around with me everywhere still trying to integrate it into my life...And justify the outragous amount of money I spent for what has been heretofore a toy...an unnecessary toy!

The upshot of all of this...the ezGed Viewer has been the first thing that I've seen that might make having a tablet worth while and cost justifiable.

Wednesday, February 15, 2012

Table It!...Part 4...Popup Menu

In this post, we are going to find all of the pieces you need to work with tables.

Popup Menu
Right-click in any cell of a table and a popup menu appears. The selections on the menu are context sensitive; that is, MS Word is showing shortcuts related to tables. The same options appear on the table-related main menu along with additional options. The popup menu is just another way to complete table-related tasks...sometimes a faster way with less clicking. The version of Word governs the number of options you have. Word 2003 has fewer options on the popup menu, while Word 2010 has more options.

Word 2003


Word 2007
Word 2010


Table Properties
Be sure to notice that in each popup, I've highlighted Table Properties. Click this option and the properties dialog appears. Between the main menu, the popup menu, and the table properties, you format tables. The method you use will end up being the one you find most convenient. I'll show you where it all is, but then it's up to you to pick your method(s). 


For the most part, the Table Properties are the same regardless of the version of Word you are using. 

Main Menu Ribbon
If you are using Word 2007 or 2010, be sure click in a table cell and look at the ribbon menu. You have lots more main menu options on the Design and Layout tabs than Word 2003 users. Word 2003 users have on the Table drop-down menu. 

Now that you know where all of the pieces are we can begin to discuss what you can do in upcoming posts. So until my next post you might want to do some exploring and get accustomed to where all these pieces are located. Tour over...next post, we get to work. 

Tuesday, February 14, 2012

Posting...I'll start again soon...

I've been working on the February 2012 issue of the Florida State Gene. Soc. newsletter. I'll try to do a post tomorrow night; however, it may be the weekend before the stream of emails stops. I'm late getting the newsletter out. February is always the worse one to get out. But at least it's complete and now I'm at the stage where I'm making corrections. So until the weekend...

Friday, February 10, 2012

Keyboard Shortcuts

I checked the stats on this blog. I noticed that lots of you have been reading about keyboard shortcuts. The shortcuts that I added were for Windows. The link below will take you to shortcuts for MS Word. After I finish the table series, I'll add notes for Word shortcuts that I actually use.

Of note...I'm a touch typist. I find using the keyboard shortcuts saves me lots of time and effort. The key to learning the shortcuts is to learn to use them one at a time. When you consistently use a shortcut (you've internalized it) then it's time to learn a new one. Over time they add up.

http://office.microsoft.com/en-us/word-help/keyboard-shortcuts-for-microsoft-word-HP010370109.aspx#BM5

Table It!...Part 3...Resizing Columns


I'm assuming in this post that you've added a table to a Word document (accepting the default settings) and that you have the ruler displaying at the top of the page.


One of the tasks necessary when working with tables in a Word document is resizing columns and rows. For the most part, you should leave rows alone. Adjusting the row height can cause hidden text in cells...not a good thing and you'll go crazy looking for text you know you added. 

In the case of columns, you'll want to make adjustments. As is the usual case with MS Word, you can make adjustments in a number of ways. It's important to understand which adjustment method to use to get the desired results.

The most common method is simply to point your cursor at a column line to display the double arrows with the column marks. Click your mouse to grab the line and then move it right or left. For simple tables, this method is fine. However, as your tables become more complicated, you need to know about another method for moving columns.That method involves using the ruler to resize columns. I've posted limited information on the ruler. See Using the Ruler if you want to refresh your memory.

Displaying the Ruler and Moving a Column
  • In Word 2003, click Insert, and then Ruler.
  • In Word 2007 or 2010, click the View tab, and then click Ruler on the Show pane.
A ruler appears above the document with another ruler running down the left side of the document. The ruler above the document is the one of interest. The white area of the ruler is the typing area on your page.

Click in any cell in the table and the Move Table Column buttons appear in the ruler. Point your cursor at a Move Table Column button and double arrows with a tip popup appear.

To grab a button and move a column, point at the button in the ruler and click your mouse. Move your mouse right or left to move the column.


Why is this method important?
As your tables become more complicated (for example, when you merge cells in the middle of a table), the Move Table Column buttons serve as the master control for resizing columns. The more complicated your table becomes the more important it becomes to know when to use the buttons on the ruler to adjust columns.

You can see this in action by completing these steps.

  1. Click your cursor in the third row of column one.
  2. Hold down your mouse and move it to the right to select the third row of columns one and two. 
  3. Let go of your mouse. Two cells are selected (highlighted).
  4. Right-click in the selected cells to display a popup menu.
  5. Click Merge Cells. The two cells becomes one cell that is two columns wide.
  6. Point your cursor at the row four column line between columns one and two. A double headed arrow with column marks appears.
  7. Click your mouse to select the column line and move it right or left. Let go of your mouse.
  8. Notice that the column lines in rows one and two above the merged cells did not move. 
  9. Click Ctrl + Z to undo the change. 
  10. Use the Move Table Column button to move the column line and all lines in the table move...regardless of the merged cells or anything else you've done to the table.
The Move Table Column buttons can also be used to align cells correctly when they just get out of whack...and that can happen to the most experienced of Word users regardless of how easy or complicated the table might be. 

I know this is tedious but if you're going to work with tables you need to know about the less obvious controls that can save your sanity on occasion. 

Thursday, February 9, 2012

iPiccy on YouTube

YouTube tutorials for iPiccy...

General: http://www.youtube.com/watch?v=SGnBlrDhSdM

Add a watermark: http://www.youtube.com/watch?v=SGnBlrDhSdM

Make a word cloud: http://www.youtube.com/watch?v=_hFSYrm3OXU

...I think I'm in love...with a piece of software...


iPiccy...Picnik Replacement

For the most part, anyone who knows me will tell you that I hate art. Let me explain. I love art that is produced by other people. I've taken more than one art history course and loved it. I've taken anyone who will go with me to almost every museum available to me to see art. I have always admired the talent it takes to produce art...a talent that I am sadly lacking. Thus, I hate when I have to produce art. I'm at such a loss.

Being a technical writer means you have to produce art. I've become adept at using the tools to capture, crop, and clean up computer screen shots. It's a skill that I use to produce the art for this blog. I've hacked my way through photo editing software, which isn't the easiest software to use and can be mega expensive. In all cases, my employer was paying for the software so it wasn't a problem for me...well, except that I had to try to learn to use the stuff.

Genealogy opened up a whole new can a of worms for me because of photographs. It's easy enough to scan a photograph, but then there is the clean up. I've been using a free online photo editor called Picnik. In one click Picnik makes choices for you that cleans up a host of problems. Google came along and bought Picnik. Now they are going to move Picnik into a Creative Suite inside of Google +.

It's OK because I'm already a member of Google +. However, I always like options. I went poking around the net today, thinking I can't be the only one lamenting the loss of quick and easy access to Picnik and I wasn't. Even better, another searcher came up with what looks to be a more than adequate substitute: iPiccy.

In iPiccy you open a copy of your photo, click the Fix Image button and it does just that for you. You can apply the corrections, and then click the Save and Share button to save (and share if you like) the cleaned up photo. The bonus? If you poke around iPiccy, you'll find that you can do lots more than you could do in the basic Picnik. iPiccy is in beta right now. Who know what they will do with it in the future? But for today, there's an easy to use tool that gives you lots and lots of photo editing options.

With iPiccy, even I can create art...so go forth and be creative with iPiccy.


Before iPiccy


After iPiccy

After iPiccy

Wednesday, February 8, 2012

Table It!...Part 2

OK...so now we start at the real beginning...adding a table to a Word document in the first place.

Word 2007/2010 selections with the Insert Table dialog.

The method you use to insert a table in Word depends on the version of Word you are using. Therefore, I'm going to separate the instructions for Word 2007/2010 and Word 2003.

Word 2007/2010: Insert a Table
On the Insert tab, click Tables. The Insert Tables dialog appears. You have a number of options.
  • If you are a visual person and you're going to accept system defaults (that means Word is picking options for you), move your cursor over the squares (properly called cells) to create a table with rows and columns. Move your cursor around and you'll see an expanding or contracting table in your doc. In the graphic above I have four columns and four rows highlighted in orange (selected). Click in the last highlighted square (lowest and farthest to the right) and that's the table you get. In addition, Design and Layout tabs appear and boy are they loaded with options.
  • If you are a person who likes to see the dialog that controls the table, click the Insert Table... option. The dialog appears. This dialog is the long standing one in which you enter the number of columns and rows, and then you have additional options you can select. See the Word 2003 instructions below for information on these fields. After you click OK, Design and Layout tabs appear with lots of options.
  • If you like maximum control, click Draw Table. A drawing pencil appears in your doc and you can draw individual cells. After you have drawn cells, click in your document to get rid of the pencil and get your cursor back. I'm usually not driven enough to use this method.
  • If you are comfortable with an Excel spreadsheet, click the Excel Spreadsheet option. Word inserts a spreadsheet for you to work in. When you click outside of the spreadsheet, Word converts the speadsheet to a table and also removes boarders (the lines identifying each cell).
  • If you want to see what MS Word has already formatted for you, click Quick Tables and the Built In tables dialog appears. If there is a table you like, click it and Word inserts it into your document. You can then replace placeholder text with your text.
Word 2003: Insert a Table
If you are still on Word 2003, you have fewer options when creating tables.
  1. On the main menu, select Table, Insert, Table. The Insert Table dialog appears.
  2. In Number of columns, enter the number of columns you want for your table. If you make a mistake, you can add columns later.
  3. In Number of rows, enter the number of rows you want for your table. If you make a mistake, you can add rows later...you already know the shortcut.
  4. Accept the default AutoFit behavior or alter it.
    --In Fixed column width, if you accept the default of Auto, the table will resize itself in relation to the margins; that is, the entire width of the page. You can set the width using the up and down arrows to create a table that isn't as wide; that is, it doesn't go margin to margin. In addition, you can make adjustments on the fly (a topic I'll talk about later).
    --In AutoFit to contents, select this option if you want the width of a column governed by its contents. For example, a column with three characters in it will be narrower than a column with ten characters.
    --In AutoFit to window, select this option if you want a table that has equal columns spaced across the width of the page.  In addition, you can make adjustments on the fly (a topic I'll talk about later).
  5. Click the Auto Format button to display the Table AutoFormat dialog. The dialog includes preformatted tables that Word Pros created for you. If you find one that you like, select it, and then click OK.
  6. Click Remember dimensions for new tables if you altered the Fixed column width in step 4. Each time you insert a new table, Word does so with the fixed column width you selected. To turn this off, select Auto in Fixed column width.
 If adding a table was a mystery to you before, you should have had an enlightening read...boring but enlightening. Upcoming posts are going to be much more interesting. You can do some cool stuff with tables.

Monday, February 6, 2012

Too Cool QR Tool...

QR codes are turning up everywhere. They are usually black and white and square...boring! Unitag gives you options. 

QR codes can be in color.

QR codes codes can appear with different alignments.
QR codes can include text.


QR codes can include a background picture.

At RootsTech Thomas MacEntee more or less indicated that QR codes should be on just about anything that you can get them to stick to...a tee-shirt, a mug, anything printed, gravestones... However, as you can see, you don't need to be stuck with the plain black and white version. You can add color and interest. To play with this too cool tool, visit Unitag (http://www.unitaglive.com/qrcode) and get creative.

Table It!...Part 1

While at RootsTech, I had the pleasure of talking to Michelle, a follower of this blog. She suggested that I write about adding tables to a Word document. Michelle explained that she likes to use tables to show census results in reports that she prepares for clients.

I'm going to start this series with a tip on how to add rows to the middle of a table. I'm starting with this piece of info because most people work their way through inserting a table but struggle when they have to add a row mid table. The shortcut is so hidden that most people don't know about it and it's handy to know.

Add a Row Mid Table on the Fly
  1. After you have a table inserted, turn on the hidden codes and look for the little squares to the right of the table. In the example above, you need to insert a row between Michael Jones and Nathan Jones.
  2. Look at the end of the row for Michael Jones.
  3. Click your cursor to the right of the line ending the table row and the left of the little square.
  4. Press the Enter key. Word adds an empty row between Michael Jones and Nathan Jones and moves your cursor to the first empty cell.
This method works in any version of Word. After you know where to place your cursor, you don't need to have the hidden codes showing. You can simply click to the right of the row where you want to add the row and press Enter. However, you need to see the symbols the first time you insert a row so that you know why it's working.

I'll start at the beginning in my next post.

Saturday, February 4, 2012

RootsTech is over...

Went to the final sessions today. Interestingly, they didn't have a closing session. Most big conferences I've attended have had them.

I went to two sessions today--One about using the Library of Congress (LOC) website and the second one about using Fold3.

The LOC one was good. At least I'll have a better chance of navigating the site in the future.

The one on Fold3 was better. They've added so much to Fold3...I didn't realize how it had evolved. I think this is the one I'm more likely to use. Not that I'd turn down info from the LOC but it looks like I can do so much more with Fold3.

In going through the exhibition hall, I found there seems to be a new movement afoot to put every body's work in a cloud (upload it to a server somewhere in a server farm). Lots of commercial software has been moving in this direction. You access the program in the cloud, you work in the cloud, and you store in the cloud. I know the cloud. I trust the cloud. A cloud can be a good place (think Katrina in New Orleans). However, the business model concerns me.

When I buy a software package that I install on my laptop, it's mine. I can put info in it and port it out to anyplace or anyone whenever I want. When you add the info to one of the cloud programs, what do you have in hand and how much control do you have on how the info is used? I'm not saying that any info would be misused. The "cloud people" constantly tell you that you own the information. They just store it for you and provide the program. I kept asking myself the question, "So, why do they keep trying to reassure me?"

When you set up one of these things up, some let you import from your current software while others require that you re-enter all of your information (ugh!). I've got about 1,800 people in one database alone.

The pricing also concerns me. I can go with a version of software I own for $x.xx and I own it. I don't have to pay storage fees, access fees, nothing. When a new version comes out, I can plunk down more cash or not. When your info is in a cloud and you can't or don't want to pay the annual fee anymore, what happens? Do you just walk away from your work? Does the cloud keep it?

From my point of view, it's handing over too much control to another party who will be able to control the price. It's low now but what will it be five years from now?

If I need cloud storage (and I do because I live in Florida), I have lots of other options some of which are free. Yes they require a bit more work; for example, you might have to move copies of files into special folders that get backed up to the cloud. But that's minor when you look five years down the road at how these genealogy-related cloud businesses might be operating. Again, I don't mean to cast stones; however, I do think a "buyer beware" is in order.

Friday, February 3, 2012

At RootsTech and then back at the Library

Went to two sessions this p.m. and both turned out to be good ones.

Thomas MacEntee did one on using QR codes, including places you should use them...everywhere you can get one to stay in place. Some funeral directors are even offering to put them on gravestones.

The second session involved turning a book into an eBook. It looks to be surprisingly easy. I took lots of notes so we'll see how it works out.

b.t.w. The tablet (ASUS Transformer) turned out to be OK for note taking. I'm still not convinced it's a reasonable thing for someone to own. Right now I'm looking at it as a pure luxury. I've got it with me in the library right now. I downloaded group sheets easily enough but they are pretty useless for doing any substantial research. As noted in my previous post, I did break down and buy Roots Magic. The previous version, which I looked at and walked away from, had a mobile app in it. I'm assuming that the current version does too. I'll be very disappointed if it doesn't.

The scanner has turned out to be a good thing. Pattie and I have been using it to scan pages in books. No more copy cards! And no more lugging home stacks of paper!

More to come...

Exhausted! But happy at RootsTech...

I'm hold up in the hotel room this a.m. creating group sheets for research later this morning at the library. The first thing on the conference schedule today that I'm interested in isn't until 1:45 p.m. So I'll go hang out at the library and do research using my new tablet. I figure if this thing is really going to be worth the money then I need to learn to use it and use it well.

I also broke down and bought a copy of Roots Magic. I've used old PAF for years because nobody could ever tell me enough to convince me to give it up. It's very basic but also highly functional. The one thing I've been loath to give up is the Custom User field, which is where I put all of my research coding. I finally got a chance to describe what I'm doing to software people. Most of them had glazed over eyes. Only the Roots Magic guy could tell me how to do what I do in his software. He even told me I could sort based on the codes...new functionally that will help! I plunked down my cash. Pattie took a picture because she couldn't believe that someone had finally talked me into an up-to-date program. Because I'm buying it at the conference, I got a bonus...a user guide. Being a technical writer, I'll read it.

Pattie took off early this a.m. to hang out in the exhibitor's area. There are all sorts of unannounced events happening on the floor. A demo here, a discussion there, and networking like crazy. MicroSoft set up a playground with ping pong and the like. It's getting lots of use.

Geneabloggers are all running around wearing big colorful beads so we can identify each other. Apparently, there are quite a few of us here at RootsTech based on the beads I see going to and fro in the crowd. We've been talking to each other. I need to spend some time reading more of these blogs. The people are interesting and I would imagine that extends to their blogs too.

So it's off to the shower before housekeeping arrives and gets upset with me for not leaving the room so they can do their job and go home.

More later...