
Insert Drop-Down List Form Field
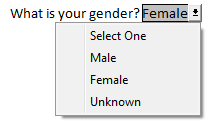
- On a new line, type a question. For example, type: What is your gender?
- Insert a form field.
--Click the Developer tab.
--In the Controls group, click the Legacy Tools button.
--Click the Drop-Down List Form Field button. A small gray box appears in your document. - Save your document.
- Right-click in the small gray box and a pop-up menu appears.
- Select Properties. The Drop-Down Form Fields Option dialog appears.
- In the Drop-down item field, type the first item on your list (Male), and then click the Add button. Word adds your entry to the Items in drop-down list field. The Add button is enabled only when you type text in the Drop-down item field.
- Repeat step 3 to add additional items (Female, Unknown).
- Repeat step 3 to add instructions for the gray box (Select One).
- Use the up and down arrows to the right of the Items in drop-down list field to rearrange items. For example, move Select One to the top of the list so that it displays in the gray box as an instruction for the person who is filling your form.
- Use the Remove button to remove a selected item from the list in the Items in drop-down list field. Depending on what you've done, you might end up with a blank entry that you might want to remove.
- Skip Run macro on fields. Macros are off topic for these posts.
- Skip Field settings fields. We'll talk about bookmarks later.
- Select OK.
Note: You can improve the attractiveness of the response by adding a space before and a space after when you are adding entries to the list. Word will read the spaces as characters and include them so that entries aren't bumping up against the outline of the gray box (like mine is in the sample above!).
Next Post
We'll talk about is enabling protection, which makes the fields work.
We'll talk about is enabling protection, which makes the fields work.
No comments:
Post a Comment