Page Setup
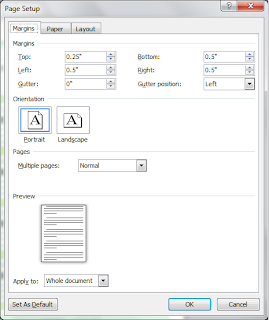
If you displayed the family group form and then displayed the Page Setup dialog, it would look like this sample.
I've sent the margins very close to the edge of the paper: Top 0.25" and Bottom, Left, and Right 0.5" each. When you create a form, you want to use as much of the page area as possible.
This layout assumes that I'm going to put my contact info in the body of the document. If I were going to put contact info in a header (or footer), the top margin (or bottom) would need to be large enough to accommodate a logo and text. In addition, I would make changes on the Layout tab to handle the header or footer. If you need to know more about these tabs, see this post: Setting
up a Book Template Part 1.
Setting Up Tables
In looking at the sample, the tables (12 of them) are set up as separate tables. The husband table has five columns and seven rows, while the wife table has five columns and six rows. Each child table has five columns and eight rows. Most of the tables are separated by one empty line using a style called spacer (3 point font with 1 point before). You need to create this style. See the Styles Posts for more information.
If you look at the sample form, you can see where table cells were merged and formatted in an effort to create some interest and make the form attractive.
If you need help setting up tables, see the table series of posts: Table Posts.
When you add the 12 tables to your document, I suggest that you create the husband, wife, and child 1 tables first. Add the fields in each of the three tables (see the previous posts for details on adding fields). Double-click each field and edit the properties based on the the type of field. Copy and paste the Child 1 table nine times and update child number in the first column of each table.
When completing the Child tables, leave the last name blank. We're going to add an automatic cross-reference that will allow your form user to type the husband's last name and then add that last name to each child table in the Last Name field.
Setting Up the Automatic Surname Fields
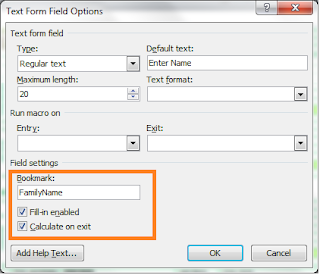
In the Husband table, in the Last Name field, when you edit this form field, it should have some special settings. Double-click the form field to display the Text Form Field Options dialog.
To complete properties:
- Complete the Type form field group as shown above.
- In the Field setting group, edit the Bookmark to give it a logical name. For example, enter FamilyName or Surname or Last_Name. Notice that the text is an unbroken string. Remember that bookmarks can't have spaces.
- Confirm that Fill-in enabled is selected.
- Click the check box beside Calculate on exit. Selecting this last check box will cause the form to update cross-references (which you will be adding next) when the user of the form presses Tab to move to the next field in the form.
- Click the OK button and save your form.
To add cross-references:
- Click in the Last Name field of the Child 1 table.
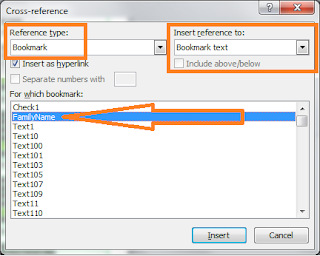
- Insert a cross-reference to the bookmark you set up in the properties dialog.
--In Word 2007/2010, click the Reference tab, and select Cross-reference in the Captions group.
--In Word 2003, select, Insert, Reference, and then Cross-reference.
The Cross-reference dialog appears. - In Reference type, Bookmark should be selected.
- In Insert reference to, select Bookmark text.
- In For which bookmark, select the bookmark you set up.
- Click Insert.
- Repeat these steps in the Last Name field for each Child table.
Testing Your Form
- Save your form.
- Enforce protection.
- Save your form as a template.
- Close everything.
- Relaunch Word.
- Open the template (form) you saved and fill in the form. (You're playing the part of end user of your form.)
- Use the Tab key to move from field to field.
- Notice that when you complete the husband's last name, the name is added as each child's last name.
- Congratulations on completing your first form! Be sure to save it.
I'll start looking at other forms and tell you how I would put them together.


No comments:
Post a Comment