The Word 2003 menu includes a few items we haven't addressed and we'll go over the first half in this post and the remainder of the options in the next post. You'll find out why when you get to the Split Table option.
Draw Table--We've talked about this option. If you like maximum control, click Draw Table. A drawing pencil
appears in your doc and you can draw individual cells. After you have drawn
cells, click in your document to get rid of the pencil and get your cursor back.
I'm usually not driven enough to use this method.
Insert/Delete/Select--I'm assuming you can use these options to insert, delete, and select to deal with all or part of tables.
Merge Cells/Split Cells...--We've used these option. Highlight two or more cells to merge them. Or, highlight merged cells and click the Split Cells... option to restore the cells.
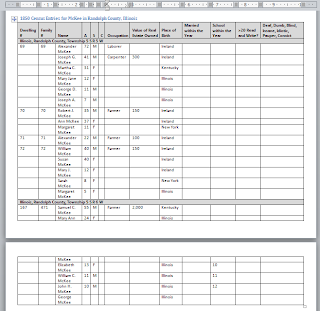
Split Table--This option allows you to split a table at any logical place. Using this option has design implications. You have to decide if you're happy to have a table just run from page to page without regard for clunking information for presentation. Consider this table.
You can handle the layout in one of two ways.
- Let the table run from page to page. You should highlight the heading row and apply the Heading Rows Repeat option to have the heading appear at the top of each page. You should also disable the Allow row to break across pages option so that you don't have part of a cell at the bottom of a page and the remainder at the top of the next page. This layout is used for tables that go on for page after page. See Table It!...Part 13...Row Formatting for a review.
- Split the table to chunk information for presentation purposes. If you look at the table above, you can see that the gray row near the bottom of page 1 is the visual break for the next McKee family in the census. Since the first family takes up most of the first page, you could use the Split Table option to split the table and place the next McKee family (and perhaps additional families) on page two.
Split a Table
- Confirm that the heading row does not have Heading Rows Repeat applied.
- Select the heading row and copy it. Point your cursor at the heading row just outside the left side of the table. Word changes your cursor from an I beam to an arrow. Click once and Word highlights the heading row. Copy the heading row (Ctrl + C).
- Click your cursor before the first character where you want to insert the break. In the case of the example above, you would click in front of Illinois.
- Paste the heading row (Ctrl + V).
- Split the table. In the example, click your cursor before Dwelling in the heading row you just added, and then click Table on the main menu to open the Table menu and select Split Table. Word inserts an empty line.
- Add a page break to move the newly split second half of the table to the next page. To do so, click in Dwelling once. On the main menu, select Format and then Paragraph. The Paragraph dialog appears. Select the Line and Page Breaks tab, click the option Page break before, and then click OK. You use this method to eliminate spacing problems.
I'm pretty sure you're scratching your head by now. You need to create a few tables and experiment with using the Split Table option to understand how it works. I'll do the remainder of the menu in the next post.
For Word 2007/2010 users, you have all of these same capabilities. They've just been moved from a drop-down menu to the ribbon. So, if you've read this post, you'll see similar instructions again when I begin talking about options on the ribbon.
.png)


No comments:
Post a Comment