Download a Graphic

- Download the pen and paper graphic at the following address: http://office.microsoft.com/en-us/images/results.aspx?qu=pen&ctt=1#ai:MC900088568|mt:0|.
- Click Download and a download dialog opens. You can get a different dialog depending on the version of Windows you are using. However, they are all similar with similar options.
- Click Save. A pop up appears. Select Save As to display a Save As dialog. Or, a Save As dialog appears automatically.
- Navigate to a location on your system where you'll be able to find the graphic. I keep a folder in my Pictures folder labeled Delete. I place all miscellaneous downloads like this one in that folder. When the folder gets full...and my system starts slowing down...I delete everything in the Delete folder.
- Give the graphic a name you'll recognize; for example, Pen.png.
- Save the graphic.
Note: We're downloading because if you copy the graphic (click the Copy button), the graphic comes in very large. You can always resize it; however, that takes a bit of practice so that you don't distort the graphic.
- Open Paint, and open the downloaded graphic (select File, Open, and locate the downloaded graphic).
- Resize your drawing palette if necessary.
The drawing area is the bright white space you see when you open Paint. When you open a file, the palette should resize automatically. However, depending on what you've been doing in Paint, the auto resizing might not happen. To resize the palette, look for small circles along the outer edge. Point at any circle and your cursor changes to a double-headed arrow. Click your mouse once to grab the circle and drag your cursor to resize the palette. When the palette is the size you want it to be, release your mouse button. - Pick a color using the color tools you read about in the last post.
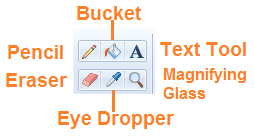
- Click the bucket tool...you're going to dump a lot of color at once. Your cursor turns into a bucket.
- Click in a pink area of the drawing. All contiguous areas where pink was turns into the new color.
- Resize the graphic to see details. See Part 5 if you need a refresher.
- Replace more colors using the bucket.

Using the bucket, you should be able to reproduce the changes I've shown in this graphic.
Erasing and Other Tasks
Since this graphic is simply for practice, we're going to mess it up. Click the eraser tool and just move it over any part of your graphic. The tool does exactly what you'd expect it to do. Press Ctrl + Z to undo the changes. One of the tasks you might do is remove the bottle of ink.

- Use the Eraser to remove the ink bottle.
- Draw the black lines necessary to complete the page edges at the bottom of the page. Adding these lines divides the drawing into areas where you'll dump color later.
--Pick the color black, and then click the Pencil tool.
--Draw the lines to complete page edges. - Draw the pink edge (or whatever color you're working with) to isolate the area below the bottom black line.
--Click the Eyedropper tool and click in the pink area to sample the color (pick it).
--Click the Pencil and draw the pink line to complete the lower edge. - Use the bucket to fill in the empty space.
--Click the Eyedropper tool and click in a color area to sample the color (pick it).
--Click the bucket and then click in a area where you want to replace the color. - Save your alter graphic.
Future Posts
As much fun as playing with colors might be, there's so much more we have to do. So stay tuned for more Paint-related posts.
No comments:
Post a Comment