Review
We've been working on a table using the Table Properties. After you insert a table, you display the properties by right clicking anywhere in a table to display a popup menu and then selecting Table Properties from the menu.
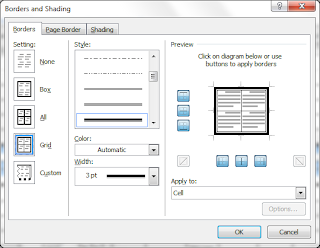
Further, we've been working specifically with the Borders and Shading dialog to affect the borders around cells and apply colors. On the Table tab, select the Borders and Shading button and you'll see the dialog below.
Remember that:
- Borders affect the lines around tables and cells.
- Page Borders affect the lines around the entire page (we haven't used this tab).
- Shading affects fill color for tables and cells.
Affecting One or More Cells
In this post we're going to affect only a few cells within the table.
Before you display Table Properties, if you select one or more cells in a table, Word assumes you are attempting to make a change that applies to the selected cells. It updates the Apply to field to Cell. Any changes you make using the Borders and Shading dialog tabs are applied only to the selected cells. You are going to do this task frequently when creating title columns. You did that task when you created the sample table in the post Table It!...Part 6...Creating the Table.
However, there are lots of other ways to affect cells that you might find useful.
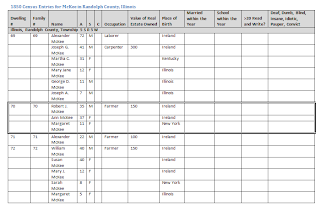
For example, when you present a table, you may want to call attention to a few lines within the table and add notes below the table about the selected area. There are lots of ways to do this task. One of them is simply to select the cells you want to highlight and then make selections from the Borders and Shading dialog. In the case of the table above, I highlighted the cells, and on the Borders tab, I picked the Grid setting, a thicker style line, and a width of 3 points.
Here's another version of the table. To get this type of presentation, I highlighted the cells, and on the Shading tab, I applied a color.
We've been doing these changes using the Table Properties, which is one of a few ways to get to the Borders and Shading tab. One of the things that makes Word confusing is that you can frequently get to the same dialog to complete a task from many different directions. The method you pick depends on what you are doing.
After you have an existing table, you can display Borders and Shading by click in the table so that Word knows you're in a table and using any of these methods.
- Right click to display a popup menu, select the Table Properties, and select the Borders and Shading button. You'll use this method when you have several tasks to complete on properties tabs.
- Right click to display a popup menu, and then select the Borders and Shading option from the menu. You'll use this method when you just want to change just borders and shading.
- In Word 2007/2010, click the Borders or Shading button in the Table Style group on the Design tab, which is a Table Tool (context tool that pops up when you click in a table).
Can you find another way to the Borders and Shading dialog? I'd say yes, there's probably a few I haven't discovered. The one you'll use will depend on what you're trying to do and what you think about at that moment. However, as usual, I'm trying to give you as many options as possible.
What You Should Take Away
- There's more than one route to the Borders and Shading dialog.
- Pay attention to the Apply to field.
- With a little work and experimenting, you can construct tables that will add interest and appeal to your work.
We're going to be talking about the Options button which displays a dialog that affect cell padding among other things.


No comments:
Post a Comment