Hi All--I'm going to be missing my posts all of this week and probably most of next week. I'm working on the syllabus and program for the Florida State Genealogical Society conference, which is 11 and 12 November. I'm using a template...
Anyway, as soon as I am able, I'll get back to posting.
Wednesday, October 26, 2011
Friday, October 21, 2011
Drop Cap...A decorative touch to a page...
In an effort to postpone talking about anchors (ugh!), I'm breaking my promise and posting about something light and easy. In the last post I talked about using clip art to dress up a page. Another item you can use to dress up a page is a drop capital letter. Here's an example:

You frequently see this type of embellishment at the beginning of a chapter.
Drop Cap 2007 or 2010


So is this bit of knowledge earth shattering? Absolutely not. But for a Friday night, it's a lot more fun than anchors. I'll work on anchors this weekend...see if I can make it easy.

Drop Cap 2007 or 2010
- Type the text where you want to add the drop cap.
- Highlight the letter you want to have dropped.
- On the Insert menu, locate the Text group, and select the drop-down arrow at Drop Cap: Dropped or In margin.
- Select a drop cap option, and then click OK.
Drop Cap 2003
- Type the text where you want to add the drop cap.
- Highlight the letter you want to have dropped.
- On the Format menu, select Drop Cap. The Drop Cap dialog appears.
- Select a drop option: Dropped or In margin.
- Click OK.

Thursday, October 20, 2011
Clipart
A few years back, I had to find a piece of clipart--a dradle, which is a four-sided spinning top associated with Hanukkah--for a presentation to a Jewish society. I'm not Jewish and I know only a passing bit about Hanukkah. What I did know was the address that would get me to Microsoft Clipart (http://office.microsoft.com/en-us/images/). When I got there, I typed in Jewish...a nice broad term that should net lots of results. The broad search term worked and not only did I pick up a dradle but I also found lots of other Hanukkah-related graphics that I could use in the presentation.
In addition to presentations, I routinely use Microsoft clipart when producing newsletters. A piece of art or two can be just what you need to take up that bit of extra space at the bottom of a page and make lines of text bump right up to the bottom margin...the ideal layout.
When you visit the site, you can search for just about any type of clipart. Be sure to enter a number of different search terms. You'll also get some funny results because of word association.
When you find a piece of clipart that you want to use, you usually have the option of Download (for Chrome) or Copy or Download (for Internet Explorer (IE)).
Copy
Click Copy and IE places a copy of the clipart on your pasteboard (a.k.a. clipboard), which is a temporary memory area on your system.
Open a new Word document and paste (Ctrl + V) the graphic in the blank Word document.
Resize the graphic. Copied graphics frequently are large and they are easier to resize in a blank document.
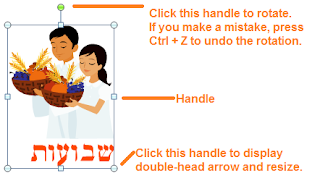
Click the graphic to display handles, and then point your cursor at the lower right handle until a double-headed arrow appears ( ↔ ). Click your mouse button and do not let it go. Move your mouse and the graphic will resize larger or smaller, depending on how you are moving your mouse. When you get a size you're happy with, let go of your mouse button.
Copy and paste your resized graphic into the document where you want it to appear; for example, to the right of the first line in a newsletter article.
Download
Click Download to download the graphic to a location on your system. A download dialog appears with two options: Open or Save.
Click Open to open the graphic on screen.
Click Save to save the graphic to a location on your system, and then insert it into a new Word document, resize it, and then copy and paste (Ctrl + C, then Ctrl +V) your resized graphic into the document where you want it to appear; for example, as a new chapter graphic in a book.
I keep a file folder on my system titled Delete. Everything that I think I'm going to use once and not need again, I place in this folder. When the folder gets too crowded, I delete all contents.
Comments
Microsoft Clipart is free...one of my favorite words. It's reliable...you won't pick up a virus. It's updated regularly by pros. Can you find additional clipart online? Yes, you can. I tend to shy away from it because I've had problems. When your're on the Web, it's always better to be safe than sorry.
On the next post, I'll talk about the dreaded text wrap around a graphic...we'll talk about anchors...they won't sink you but some days you'll swear they are trying.
In addition to presentations, I routinely use Microsoft clipart when producing newsletters. A piece of art or two can be just what you need to take up that bit of extra space at the bottom of a page and make lines of text bump right up to the bottom margin...the ideal layout.
When you visit the site, you can search for just about any type of clipart. Be sure to enter a number of different search terms. You'll also get some funny results because of word association.
When you find a piece of clipart that you want to use, you usually have the option of Download (for Chrome) or Copy or Download (for Internet Explorer (IE)).
Copy
Click Copy and IE places a copy of the clipart on your pasteboard (a.k.a. clipboard), which is a temporary memory area on your system.
Open a new Word document and paste (Ctrl + V) the graphic in the blank Word document.
Resize the graphic. Copied graphics frequently are large and they are easier to resize in a blank document.

Click the graphic to display handles, and then point your cursor at the lower right handle until a double-headed arrow appears ( ↔ ). Click your mouse button and do not let it go. Move your mouse and the graphic will resize larger or smaller, depending on how you are moving your mouse. When you get a size you're happy with, let go of your mouse button.
Copy and paste your resized graphic into the document where you want it to appear; for example, to the right of the first line in a newsletter article.
Download
Click Download to download the graphic to a location on your system. A download dialog appears with two options: Open or Save.
Click Open to open the graphic on screen.
- If the graphic is a drawing, it will most likely open in MS Paint, a graphics program.
- If the graphic is a photograph, it will most likely open on screen...frequently in Picasa.
Click Save to save the graphic to a location on your system, and then insert it into a new Word document, resize it, and then copy and paste (Ctrl + C, then Ctrl +V) your resized graphic into the document where you want it to appear; for example, as a new chapter graphic in a book.
I keep a file folder on my system titled Delete. Everything that I think I'm going to use once and not need again, I place in this folder. When the folder gets too crowded, I delete all contents.
Comments
Microsoft Clipart is free...one of my favorite words. It's reliable...you won't pick up a virus. It's updated regularly by pros. Can you find additional clipart online? Yes, you can. I tend to shy away from it because I've had problems. When your're on the Web, it's always better to be safe than sorry.
On the next post, I'll talk about the dreaded text wrap around a graphic...we'll talk about anchors...they won't sink you but some days you'll swear they are trying.
Tuesday, October 18, 2011
Password Protecting a Document
I have had only rare occassions when
I have added or used a password on a document. To me, genealogy applications
would also be rare. However, applying a password is an option that you should
be aware of in case you have occassion to use it. The choices you see below are
all made when the document that you want to apply that password to is open.
Word 2010


-
Select File, Info, Protect
Document, and then Encrypt with Password. The dialog appears.
-
Enter a password. Be sure to write
it down so that you can open the document again.
-
Click OK. A confirmation
dialog appears.
-
Enter the password again, and then
click OK.
-
Close the document, and then open it
again. A Password dialog appears.
-
Enter the password, and then click OK.
Word 2007

- Select File, and then Save As. The dialog appears.
- Click the Tools button at the bottom of the dialog. A drop-down menu appears.
- Select General Options. The dialog appears.
- In the field Password to open, enter the password. Be sure to write it down so that you can open the document again.
- Click OK. A confirmation dialog appears.
- Enter the password again, and then click OK.
- Click the Save button, and then close the document.
- Open the document again. A Password dialog appears.
- Enter the password, and then click OK.
-
Click the Tools menu, and
then select Options. The dialog appears.
-
Click the Security tab.
-
In the field Password to open,
enter the password. Be sure to write it down so that you can open the document
again.
-
Click OK.
-
Save and then close the document.
-
Open the document again. A Password
dialog appears.
-
Enter the password, and then click OK.
Can a password be cracked? Just
about anything can be cracked by a pro. However, for the average user, this
type of password is sufficent to protect a file.
While you're exploring the password options be sure to
notice that there are also some editing options that you may want to look at.
When you apply an editing password, everyone can see your document; however,
only those readers with the password can edit the document.
Friday, October 14, 2011
Internet Explorer Hint: Auto Complete Address Error
Description: While typing a web page address in the field,
you made a mistake and now the auto complete shows the mistake every time. To
get past the error, you have to type the entire address.
Suggestion: Delete the error from the auto complete list. If
the list isn’t displaying, click the drop-down arrow (circled below), point
your cursor to the incorrect entry, and then move your cursor to the right to
display the delete button. Click the Delete
button to remove the entry. If you mistakenly delete a correct address, don’t
worry. The next time you type the address in the field, Internet Explorer adds
the address back to the list.

Thursday, October 13, 2011
Internet Explorer Hint: Auto Complete Drop-Down
Description: You’re on one web page and you want to go to another page…a page you visit all the time.

Suggestion: You can always start typing the address. Or, you can use the drop-down menu to select the address.
Click the drop-down arrow in the toolbar beside the address and a list appears. Use your cursor to point to an entry in the list and click it. The new web page appears.
Click the drop-down arrow in the toolbar beside the address and a list appears. Use your cursor to point to an entry in the list and click it. The new web page appears.

Wednesday, October 12, 2011
Internet Explorer Hint: Auto Complete
Description: You’ve typed part of an address and the
remainder of the address appears. The auto complete feature—a shortcut—is
working.
Suggestion: Stop typing when the address pops up and read
it. If it’s where you want to go:
In Internet Explorer: Hold down the Shift key and press the Enter
key.
In Google Chrome: Press the Enter key.
Internet Explorer Hint: Multiple Sessions
Description: You have one web page displayed but you’d like
to start a new web page to check on something else without losing the first web
page.
 When you have a few tabs, you can move from web page to web page. To flip through open web pages (tabs), hold down the Ctrl key and press the Tab
key.
When you have a few tabs, you can move from web page to web page. To flip through open web pages (tabs), hold down the Ctrl key and press the Tab
key.
Suggestion: Select the New
Tab button (in Google Chrome a plus (+)
button). You can open several tabs and have several web pages running at once.
Tuesday, October 11, 2011
Setting Up a Book Template Part 17
Hope you figured out the footers with the lines. I didn't provide step-by-step instructions because I figure you've been in and out of the footer enough that you should be able to handle it with the mininal comments I made. If that isn't the case, post a comment and I'll add the instructions.
We've pretty much exhausted the topic of setting up a template. If you follow the parts 1-16, you should have a working template. More important, you should have a better understanding of what Word does with section breaks, Same as previous (on or not), and dealing with headers and footers, including automation.
Recently, we've been working with a copy of the Genealogy Book template. Don't forget to save the changes you've made--for example, adding and applying the style Header_Line--you need to save the instance of Genealogy Book.doc (or docx) as Genealogy Book.dot (or dotx). You already learned to do this task in Part 12.
The next task of course is yours; that is, writing a book. Open your template, add text, add chapters, update your table of contents, add index entries and insert an index, and finalize your document.
I'll be moving on to other topics...I'm not sure where I'll go. If you have something you'd like me talk about, please email me (info@technology-tamers.com) or post a comment with a suggestion or question.
Sunday, October 9, 2011
Setting Up a Book Template Part 16
Adding
a line to a header and footer creates a frame for the text on a page that is a
decorative element of your layout. To create the frame, you add the line below
the header and above the footer. The line can be any sort of line. I tend to
like thin straight lines because I like the clean look of it. However, in
family histories, particularly commemorative books, I’ve seen all sorts of
lines. My favorites tend to be what I call the little town lines. Here’s an
example.
This line is free Microsoft clip art that has been around in
one form or another for years.
Using
graphics software—something as simple as Paint—you can create your own line or
string all sorts of copied bits together to create lines. You just need to make
sure that your line isn’t too wide or too long for the space you have in a
header or footer. This is of course art again…I avoid art because I can usually
find the art I need online and free.
If this topic sounds familiar, it’s not your imagination. I’ve
talked about these lines in an earlier post. See Frame Up Part One. When adding that post, I had not started this series about templates. However,
now that we are here, there are a few things you should consider when adding these
lines (and other element you might want to add to headers and footers) to make
dealing with them in a template easier.
If It’s Art
When
you add a graphic as the decorative element—for example, the little town line
above—you can use the Same as previous
(Link to Previous) in headers and
footers to control where the line does or does not appear. You got lots of
practice using these tools while setting up Genealogy Book.
In
the case to the little town line, I would be inclined to add it to footers…all
of my footers. Center it and add footer text below it. I would match the font
color to the color used in the little town line. The graphic could work in a
header too. My inclination there would be to place it above header text and
make it the only decorative header/footer element.
If It’s a Style
Another
option is to modify the header and footer style so that it includes a line
below header text and above footer text. You can find the instructions for
adding the lines in the Frame Up Part One.
When
you look at the design of the template we’ve developed (Genealogy Book) most
pages include footers and headers. The exceptions are the front matter of the
book (cover, title pages, etc.) and the first page of a chapter (or section),
which have no header. Hmmm…that isn’t quite true. The header and footer styles
have been applied on all pages in all headers and footers; however, we used the
Same as previous (Link to Previous) to suppress having
any text appear. If we add line elements to headers and footer, we’re going to
mess up that layout because lines will suddenly start appearing in headers and
footers where we don’t want them to appear.
Styles
to the rescue! A simple workaround is to create a second set of header and
footer styles based on the existing header and footer styles. The only
difference in the new styles is that they will have another name and a line
element.
Creating Header_Line
When
you want to create additional header styles, be sure to start the name with
Header. Word isn’t going to care what comes after Header. It just wants to know
what type of style it is and the word Header
gives Word that piece of information.
Steps:
- Open Genealogy Book. I’m assuming you still have the 30 page template.
- Display the Styles (or Styles and Formatting) pane.
- Scroll to the first page where you have the book title in the header, which should be ii (10 of 30).
- Double-click in the header area to open the header. In the Styles (or Styles and Formatting pane), Word moves the outline that marks the selected style to Header.
- Create a new style based on the Header style (selected by default) and name that style Header_Line. After you click OK to save Header_Line, Word applies it to the header text…a line appears.
- Scroll toward the beginning of the document. You’ll find that none of the previous headers have the line.
- Scroll toward the end of the document. You’ll find that the line has been added to each header that includes the book title.
- Go to iii (11 of 30). You can use Go To (Ctrl + G) and enter iii.
- Double-click in the header and apply the style Header_Line.
- Scroll toward the beginning of the document. You’ll find that none of the previous headers have the line.
- Scroll toward the end of the document. You’ll find that only the place where you changed the header has the line. To get the line in the remaining headers (even headers), apply the Header_Line style to the headers on the following pages: 3 (15 of 30); 7 (19 of 30); 11 (23 of 30); 15 (27 of 30).
- Preview your document and you should see no lines where you have the style Header applied and lines where you have the style Header_Line applied. If you need to make adjustments, close the preview and click in the header and pick Header or Header_Line as appropriate.

Create Footer_Line
Repeat
the process above. Substitute the word footer, where you see header. Also, when
you must select a line in the Boarder dialog, select the line above the text.
Analysis
All
of this works be.cause you have isolated sections with section breaks, and you
are using two sets of styles: Header/Header_Line and Footer/Footer_Line.
On the surface, this task looks complicated. However, if you go step-by-step, it's easy to see what is happening. Please
post questions if you have any.
Wednesday, October 5, 2011
I'll Start Posting Again...
I promise. But it will probably be this weekend coming. I've been working on the Florida State Genealogical Society Newsletter. I've also been busy being sick...seems the man in my life finally managed to infect me with whatever version of the creeping crud that is going around these days. I feel better today. But I have to get the state newsletter to bed before I do anything else.
I've got a draft of my next post started about handling headers and footers...that is, having two different headers and/or footers in the same document or template. There's a shortcut that makes your life a lot easier. I'll try to post it on Friday.
I've got a draft of my next post started about handling headers and footers...that is, having two different headers and/or footers in the same document or template. There's a shortcut that makes your life a lot easier. I'll try to post it on Friday.
Subscribe to:
Posts (Atom)