If you liked the post about creating an electronic table of contents, you’re going to love this post about creating a simple electronic index.
All of my documents have extensive indexes. When I create long documents, I sit at night with my laptop in front of the TV, listening to whatever drivel is pouring out, and I index.
To complete the tasks I’m suggesting for this post, you need to have a document with a few pages. It doesn’t make any difference what the topic of the document might be. You just need a few pages. However, you’ll understand the process better if you use a family-related document with names for both people and places.
Indexing Family Names
1. Open your document.
2. Locate a place where you want to add an index entry and click to place your cursor. For example, you would click immediately behind Smith in the following name: Mary Jane (McKee) Smith.
3. Hold down the Shift and Alt keys, and then type the letter X. (Shift + Alt + X). The Main Index Entry dialog appears.
 4. In the Main entry field, enter the person’s last name. For example, enter Smith.
5. In the Subentry field, enter the person’s given name. For example, enter Mary Jane (McKee).
6. Click the Mark button at the bottom of the dialog…and don’t jump out of your skin when you see all of the hidden marks come up. You didn’t do anything wrong. Word is showing you the index entry, which looks like this:

The dialog remains open.
7. In the Main entry field, enter her maiden name: McKee.
8. In the Subentry field, enter her given name: Mary Jane. Entering a woman’s name in this manner gives you a cross-reference under both her maiden and married name.
9. Click the Mark button at the bottom of the dialog.
10. Click Cancel to close the Mark Index Entry.
11. Go to the next place where you want to make an index entry, and repeat steps 3 through 10.
12. Complete entries for several names in your document.
Indexing Place Names
1. Locate a place where you want to add an index entry. For example, click immediately behind a place name: Sparta, Randolph County, Illinois.
2. Click to place your cursor.
3. Hold down the Shift and Alt keys, and then type the letter X. The Main Index Entry dialog appears.
4. In the Main entry field, enter the state or county name. For example, enter Randolph County.
5. In the Subentry field, enter the town name. For example, enter Sparta.
6. Click the Mark button at the bottom of the dialog. Your index entry looks like this:

7. Repeat steps 1 through 6 for several place names in your document.
Turning off the Hidden Codes

I’ve talked about hidden codes before; however, it may not have meant much to you at the time. Turning these codes on and off involves pressing the Show/Hide button, which is a toggle (like a light switch with an on/off position).
--In Word 2003, the button is a Toolbar option.
--In Word 2007 or 2010, the button is on the Home tab in the Paragraph group.
Or, you can turn codes on and off by holding down the Shift and Ctrl keys, and typing * (an asterisk). You need to turn the codes off to get correct page numbering in a generated index. You need to turn the codes on to be able to see and make corrections to index entries.
Generating the Index
1. Go to the end of your document and hit Enter once to get a blank line.
2. Type the word Index and apply a Heading 1 style to it. Applying a Heading 1 ensures that Index appears in the electronic Table of Contents.
3. Hit Enter once to get a blank line.
4. Display the Index and Tables dialog.
--In Word 2003, select Insert, Reference, and then Index and Tables.
--In Word 2007 or 2010, click the References tab. Locate the Index group. Select the Insert Index button.
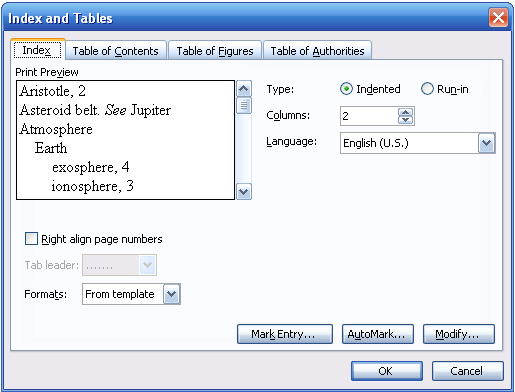
5. Look at the Print Preview box, which shows you a preview of what your entries will look like.
6. Locate the Right align page numbers check box below the preview, and click it to select it. Notice that your preview changes.
7. Click OK. Word inserts an electronic index.
Editing Index Entries
1. Inspect your index. I almost always find something that I’ve fat fingered.
2. Note the page number so that you can go to it.
3. Hold down the Ctrl key and type the letter G to display the Go To dialog.
4. Enter the page number, and then click Next. Word scrolls to the page.
5. Turn on hidden codes (Shift + Ctrl + *).
6. Look for the entry that is in error and correct it. Be careful not to remove or alter any of the special marks included in the entry. Alter only the text you entered.
7. Turn off hidden codes.
8. Go to the end of your document, and update the index.
9. Select one or two lines in the index, and press the F9 button.
10. Look for the index entry that had an error in it to confirm that it is correct.
This post covers inserting a simple index. However, I’m sure you’ve noticed that there are lots of other options in the dialogs that you’ve seen today. Some are more useful than others and over the next year or so I’ll discuss many of them. I’ll try to relate them to something a genealogist would actually do. However, it won’t be today!
No comments:
Post a Comment